Comprehensive light pole installation hinges on careful pre-project planning, strict compliance with local structural codes and safety standards. Contractors select qualified installation approaches after evaluating site soil and regional wind loads; properly engineered steel light poles deliver reliable load resistance, extended service life and public safety.
Key Takeaways
- Pick the best way to install the pole for your soil and project. Direct burial saves money if the soil is strong. Anchor-based works better for heavy poles.
- Check the light poles often. Look for rust, loose bolts, and cracks every year. This helps keep the poles safe and lasting longer.
- Source certified materials. Procuring steel poles manufactured to recognized international standards (such as ASTM or EN) ensures compliance with local building codes and structural longevity. For engineered solutions tailored to specific project requirements, you can consult technical specifications at MORELUX.
Light Pole Components Overview

Light pole systems help light up streets and parking lots. They are also used in other public places. Each system has important parts. Every part has its own job and is made from a certain material. The table below shows the main parts in most steel light poles:
| Component | Material | Function |
|---|---|---|
| Anchor-based Pole | Steel | Attached to a concrete foundation with anchor bolts for stability. |
| Direct Burial Pole | Steel | Installed by inserting the shaft into the ground without a concrete base. |
| Hand Hole Cover | Steel | Allows for electrical connections and maintenance of internal wiring. |
| Pole Cap | Steel or Aluminum | Covers the top of the pole; necessary if lights are mounted on the side. |
Steel is the best choice for outdoor lighting. It is strong and lasts a long time. This is why it is used for street and parking lot lights. Hot-dip galvanized steel stops rust and can last up to 40 years. This makes it a good choice for projects that need to last. Paint or powder coating makes steel even stronger. These finishes may need some care over time.
Engineering Insight: Selecting high-tensile steel hot-dip galvanized in accordance with ASTM A123 provides maintenance-free corrosion resistance for up to 40 years. For customized configurations including high-mast and solar integrated designs that match distinct regional wind load requirements, manufacturers like MORELUX provide comprehensive technical drawings and structural calculations.
All these parts work together to make light pole systems safe and reliable. Picking and installing the right parts helps save energy. It also helps outdoor lights last longer.
Light Pole Installation Methods
Picking the right way to install a pole light is very important. There are two main ways to do this job. One is the direct burial method. The other is the bolt down (anchor-based) method. Each way has its own steps, costs, and needs. Morelux is a top steel pole factory. They sell wholesale and custom poles for both ways. Their products follow world rules. This makes them good for many lighting jobs.
Direct Burial Method
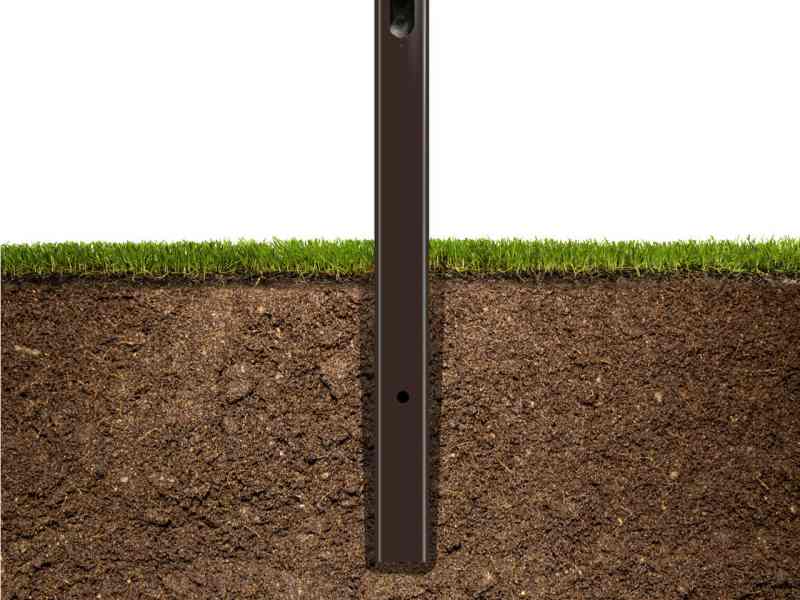
The direct burial method puts the pole right in the ground. Workers dig a hole, put in the pole, and fill it with concrete. This way is fast and saves money. It works best where the ground is strong and when you need quick work.
| Installation Method | Cost Effectiveness | Installation Time |
|---|---|---|
| Direct Burial | Cheaper because it uses fewer things and is simple. | Faster because you just dig and fill the hole. |
The type of soil is very important for direct burial. Clay and strong dirt hold the pole well. Sandy or rocky ground may need extra work or tools. The table below shows how deep to bury poles of different heights:
| Pole Height (feet) | Recommended Depth (feet) |
|---|---|
| 8-18 | 3 |
| 18.1-25 | 4 |
| 25.1-40 | 5 |
| 40.1-50 | 6 |
Regulatory Note: The depth chart above represents baseline values for Class 5 cohesive soils (medium clay). Actual embedment depth must be verified by a geotechnical engineer based on the local frost line depth and wind load calculations (ASCE 7). Backfill must consist of structural concrete or engineered well-graded aggregate compacted in 6-inch lifts; standard loose soil or uncompacted dirt is structurally non-compliant.
Direct burial poles need special coatings to stop rust. This is very important in wet or salty places. If a pole gets rusty or breaks, workers must take out the old concrete and put in a new pole. Checking the poles often helps keep people and property safe.
Bolt Down (Anchor-Based) Method
The bolt down method uses a concrete base with anchor bolts. Workers put the pole on a steel plate that sits on the bolts. This way gives strong support and makes it easy to change the pole. It is used in cities, stadiums, and places with big lights.
| Installation Method | Description |
|---|---|
| Anchor-base Installation | Uses a steel plate bolted to a concrete base for easy leveling and changing poles. |
Anchor bolts come in many types and strengths. The table below lists some common ones:
| Grade | Min. Yield Strength | Color Code | Material | Typical Use |
|---|---|---|---|---|
| Grade 36 | 36 ksi | Blue | Low carbon steel (A36) | For lighter jobs |
| Grade 55 | 55 ksi | Yellow | Modified mild steel | For lighting and traffic poles |
| Grade 105 | 105 ksi | Red | Medium carbon alloy | For big and heavy poles |
Tip: All anchor bolts should be hot-dip galvanized. This keeps them safe from weather and helps the pole last longer.
Installing anchor-based poles needs careful leveling and lining up. Workers must not make the bolts too tight or too loose. Checking the bolts often helps keep the pole safe and strong.
Choosing the Right Method
Teams must think about many things before picking a way to install a pole. The table below shows what to look at:
| Factor | Description |
|---|---|
| Building codes | You must follow local rules for both ways. Rules are different for homes and businesses. |
| Wind load calculations | Poles must stand up to wind. This changes the pole and base you need. |
| Soil conditions | Strong dirt is good for direct burial. Weak dirt may need anchor-based poles. |
| Maintenance needs | Anchor-based poles are easier to fix or change. |
| Project timeline | Direct burial is faster. Anchor-based takes more time because the concrete must dry. |
- Direct burial is good for cheap projects with strong dirt.
- Anchor-based is better for heavy poles or tough places.
- Both ways need good work and a strong base for safety and long life.
Qualified manufacturers provide comprehensive structural calculations and finite element analysis (FEA) reports for both installation configurations. Technical support and custom design blueprints tailored to specific project site conditions can be sourced through Morelux.
Alert: Always follow local rules and industry standards. Get the soil checked and let the base dry well for every light pole job.
Direct Burial Light Pole Installation Steps
Tools and Materials
Workers need the right tools and materials for pole light installation. These items help them complete the job safely and efficiently. The following list shows what teams use for direct burial light pole installation:
- Shovel or post-hole digger
- Concrete mix
- Level
- Screwdriver
- Wire nuts
- Electrical tape
- Wire strippers
- Circuit tester
- Conduit pipe fitted wiring
- Concrete float
Each tool serves a specific purpose. The shovel or post-hole digger creates the hole for the pole. Concrete mix secures the pole in place. The level checks if the pole stands straight. Electrical tools help with wiring and safety checks. Workers use a concrete float to smooth the surface after pouring concrete.
Tip: Teams should check all tools before starting. This prevents delays and ensures proper installation.
Preparing the Foundation
A strong foundation keeps the pole light stable for years. Teams follow several steps to prepare the site:
- Attach fixtures and accessories to the pole before raising it.
- Thread wiring from the top of the pole down to the access hole near the base.
- Dig a hole that is twice as wide as the pole’s base. The depth depends on the pole height:
- 8–18 feet pole: 3 feet deep
- 18.1–25 feet pole: 4 feet deep
- 25.1–40 feet pole: 5 feet deep
- 40.1–50 feet pole: 6 feet deep
- Tamp the floor and walls of the hole to make them firm.
Teams must avoid common mistakes during foundation preparation. They should assess the site carefully and check soil conditions. Workers must assemble the pole and racking correctly. Heavy-duty guides help keep the pole straight. Metal sleeves or slurry prevent the hole from collapsing. If underground water is present, workers use a tremie to pour concrete.
Note: Vibrations from installation can affect nearby structures. Teams monitor vibrations and switch to quieter methods if needed.
Setting and Securing the Pole
Workers lower the pole into the hole and guide the wires through the cable entrance to the hand hole. They use a plumb bob to keep the pole straight. Teams add 4 to 6 inches of backfill, such as soil or crushed rock, to support the pole. They pack the backfill as they go. This process continues in layers until the hole is full.
Teams must keep the steel cage centered. Spacers help prevent rust and failure. Each layer of backfill is tamped to ensure the pole stays secure. Workers check the pole’s alignment often during this stage.
Wiring and Final Checks
After securing the pole, workers connect the electrical wires in the hand hole. They follow local electrical codes for safety. Teams use wire nuts, electrical tape, and circuit testers to check connections. They inspect the pole base, mid-section, and top fixtures.
- Inspect Ground Embedment: Verify that the compacted backfill or concrete collar shows no signs of shifting, voids, or lateral subsidence.
- Electrical Testing: Perform an insulation resistance test (megger test) on all conductors and measure the grounding system to ensure earth resistance meets code requirements (typically $< 25 \Omega$ per NEC 250.56).
- Surface Integrity: Check for any scratches or damage to the protective coating incurred during erection. Immediately apply a zinc-rich cold galvanizing compound to prevent localized corrosion.
- Hardware Verification: Ensure the handhole cover, pole top cap, and luminaire brackets are fully secured with tamper-resistant stainless steel fasteners to protect internal wiring from moisture ingress.
Teams perform these checks at least once a year. Regular inspections help prevent problems and extend the life of the light pole installation.
Tip: Morelux offers steel poles with strong coatings and custom designs. Their products meet international standards and support proper installation for pole light projects.
Anchor-Based Light Pole Installation Steps
Tools and Materials
Teams need special tools and materials for anchor-based pole light installation. These things help workers build a strong base and install the pole right. Here is what they need:
- Concrete mix with the right strength for lasting support
- Anchor bolts or J-bolts that do not rust
- Rebar for spreading out stress in the concrete
- Bolt templates to keep bolts spaced and lined up
- Level for checking if the base is flat
- Torque wrench for tightening bolts just right
- Crane or forklift to lift the pole
- Electrical wiring and connectors
- Personal protective equipment (PPE) like gloves, helmets, and vests
Tip: Workers should check all tools before they start. Using the right materials helps avoid problems and makes the pole last longer.
Safety is very important when installing pole lights. Teams follow safety rules to keep everyone safe and stop accidents. The table below shows safety steps and dangers:
| Safety Practices | Common Hazards | Prevention Tips |
|---|---|---|
| Use PPE every time | Pole tipping | Use good rigging and careful lifting |
| Control the lifting area | Bolt misalignment | Set templates right before pouring concrete |
| Keep extra workers away | Electrical shock | Test wires and ground everything |
| Use fall protection if needed | Trip hazards | Mark trenches and open pipes |
| Turn off circuits before wiring | Falling objects | Keep extra people out of lifting area |
| Keep first aid and fire tools nearby | N/A | N/A |
| Use barriers and warning signs | N/A | N/A |
Installing the Anchor/Base
Workers start by getting the anchor base ready for the light pole. They follow these steps to do the job right:
- Cut out the template and its supports.
- Mark and drill the bolt pattern.
- Attach the bolts to the template.
- Put the template on the form and check if it is level.
- Fasten the template to the supports and attach the supports to the H frame.
- Secure the cage to the supports.
- Pour the concrete and take off the template after it hardens.
Bolt templates help keep bolts spaced and lined up. Checking the base with a level while the concrete is still soft stops leaning poles. Workers wait for the concrete to get strong before putting up the pole.
Note: Picking the right anchor bolts and rebar spreads out stress and stops cracks. Morelux makes steel poles for both anchor-based and direct burial jobs. Their products meet world standards and work well.
Sometimes, problems happen during anchor installation. Workers may find dirt in drill holes or bolts that do not line up. They fix these by keeping tools clean, clearing holes, and watching the water-cement mix. Using a torque wrench to tighten bolts helps the anchors work well. Teams look at technical papers for the right torque numbers.
Block Quote:
“Dirt in the drill hole from low air pressure can block the grout. Fix this by keeping air pressure up, cleaning tools, and clearing holes well. Also, watch the water-cement mix and make sure holes are open for good grouting.”
Mounting the Pole
After the concrete base is hard, workers put the pole on the anchor bolts. They do these steps:
- Attach lights and other parts to the pole before lifting.
- Run wires through the pole from the top to the hole near the bottom.
- Use a crane or forklift to lift the pole onto the anchor bolts.
- Tighten the pole with nuts and washers.
- Use a plumb bob to make the pole stand straight.
Structural alignment requires a dual-nut system (leveling nuts below the base plate and heavy-hex nuts above). All anchor bolts must be tightened using a calibrated torque wrench to the exact tension specified in the project’s engineering submittals, utilizing the turn-of-nut method or specific torque values based on bolt grade (e.g., ASTM F1554).
Tip: Good installation stops leaning and keeps the pole safe in storms. Morelux gives engineering help and custom designs for pole light jobs.
Leveling and Wiring
Workers finish by making sure the pole is straight and wiring is connected. They use a level to check if the pole stands up right. Teams tighten nuts with a torque wrench to the right tightness. They connect the ground wire and other electrical parts.
Teams fill in dirt around the base. They connect wires in the hand hole and follow local electrical rules. Workers test the wires and make sure everything is grounded to stop shocks.
Checking the pole often helps keep it working well. Teams look for rust, cracks, and loose bolts. They check arms and brackets for metal wear. Covers for handholes, bases, and tops must be tight.
Alert: Teams should check the pole at least once a year. Regular checks help the pole last longer and keep the area safe.
Anchor-based installation gives strong support and easy care. Workers follow each step to make sure the job is done right. Morelux steel poles are strong and last a long time for city, stadium, and public light jobs.
Good light pole installation begins with smart planning. Teams check the site and follow local rules for safety. They make sure the poles help people see well. Teams look at the poles every year to keep them strong. This also keeps the area bright. Morelux gives custom help, drawings, and quick prices for projects. Experts help teams avoid mistakes.
| Requirement Type | Description |
|---|---|
| Building Codes | Follow the rules for each pole job. |
| Wind Load Calculations | Pick poles that can handle local wind. |
FAQ
How deep should workers bury steel light poles?
Depending on the pole’s height, workers should bury it 3 to 6 feet (approximately 0.9 to 1.8 meters) underground. The deeper the burial, the better the stability of a taller pole.
Can one person install a light pole alone?
No. At least two people are required to install a light pole. This ensures safety and facilitates tasks such as hoisting, leveling, and wiring.
What maintenance is required for steel light poles?
The construction team should inspect the poles annually for rust, loose bolts, and cracks. They should repaint or recoat any damaged areas to maintain the pole’s strength.